
By your trusted QuickBooks Online Gold Partner in Bozeman, Montana.
1. Recurring Transactions – Automate the Repetitive Stuff
When you’re juggling a growing business, you’ll find yourself paying the same bills and receiving the same invoices day after day. A simple but powerful feature in QuickBooks Online is Recurring Transactions. It lets you set up a template for any type of transaction—customer invoices, vendor bills, or even mileage logs—and have it automatically generate at the schedule you choose.
Why It Matters
Think of the hours you spend reviewing each invoice or bill. Recurring transactions cut that workload to zero. Plus, they reduce errors because the data is consistent every time it’s generated.
How to Set It Up
- Go to Gear Icon > Recurring Transactions.
- Click New and choose the transaction type.
- Fill in the details, then set the frequency (weekly, monthly, etc.).
- Save, and QBO will handle the rest.
2. Bank Rules – Let Your Accounts Talk to Each Other
Every time a deposit or withdrawal appears in your bank feed, QuickBooks Online asks you to categorize it. That’s okay for a handful of transactions, but what about a business that processes 200+ bank items a month? Bank rules are your secret weapon.
With a single rule, you can automatically tag expenses with the correct account, assign a customer or vendor, and even add a memo. This eliminates manual data entry and ensures your reports reflect accurate, up-to-date information.
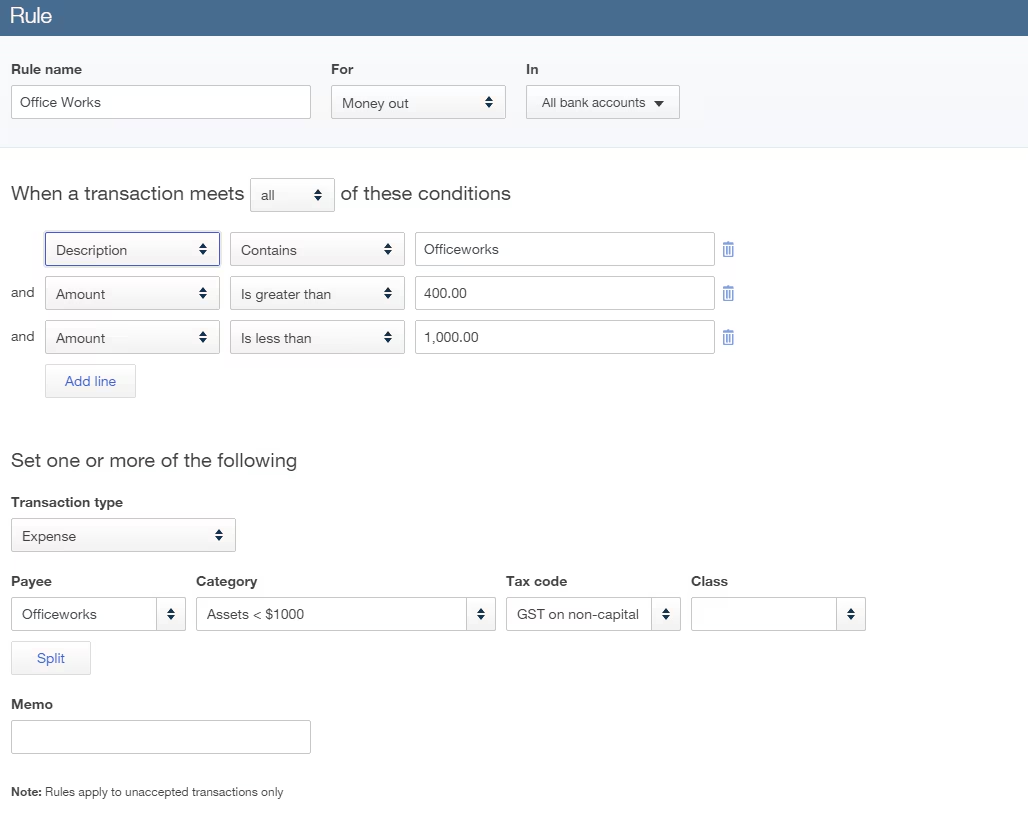
Step-by-Step: Creating a Rule
- Navigate to Banking > Rules.
- Click New Rule and give it a descriptive name.
- Define the Condition (e.g., “Description contains ‘Utility’”).
- Set the Action (e.g., “Account: Utilities Expense”).
- Review, then activate the rule.
Once activated, the rule will process every new transaction that matches the condition—every single time—without you having to lift a finger.
3. Classes & Locations – Track Income by Department or Outlet
If you run a multi‑location business, or simply want to see how each part of your company is performing, Classes and Locations give you that insight. You can tag every transaction with a class (e.g., “Retail” vs. “Wholesale”) or a location (e.g., “Bozeman” vs. “Missoula”).
| Feature | Use Case | Benefits |
|---|---|---|
| Classes | Track revenue by product line | Identify which line is most profitable |
| Locations | Separate financials for each store | Streamline tax reporting per state |
| Both | Analyze profit per store and product | Make data‑driven decisions quickly |
Setting up classes and locations is straightforward, and you can view reports that filter by these categories, giving you a clear picture of how every segment of your business is doing.
Tip
We recommend labeling each class and location with a consistent naming convention. That way, new team members will know exactly where to find the right data.
4. Custom Reports – Create the Insights You Need
QuickBooks Online offers a suite of ready‑made reports, but the real power lies in customizing them to fit your specific metrics. Whether you want to track the average number of sales per day or see a month‑over‑month comparison of expense categories, you can modify almost any report.
How to Custom‑Build a Report
- Navigate to Reports and select a base report.
- Click Customize at the top right.
- Adjust filters, select columns, and apply conditional formatting.
- Save the customization for future use.
Once saved, you can schedule the report to email your team automatically each month—no manual clicking required.
5. QuickBooks Online Mobile App – Bookkeeping On The Go
For the Bozeman entrepreneur who spends most of their day outdoors—whether scouting new timberlands or meeting with clients in the mountains—having a reliable mobile app is essential. The QBO mobile app gives you instant access to:
- Send invoices and receive payments
- Capture receipts with your phone camera
- Track mileage with GPS integration
- View real‑time financial dashboards
Because the app syncs instantly with your desktop account, you never lose a transaction. It’s also incredibly useful for on‑hand expense tracking—just snap a photo of a receipt, and the app will upload it to the correct transaction automatically.
Putting It All Together: A QuickWin Checklist
Ready to start using these features? Here’s a quick checklist to get you moving:
- Set up at least two recurring transactions for common bills and invoices.
- Create a bank rule for the biggest expense category.
- Define one class and one location.
- Customize a profit & loss report to show your top three product lines.
- Download the mobile app and try capturing a receipt.
By tackling these tasks, you’ll instantly reduce manual work and gain clearer insight into how your business is performing.